=== api-reference/blobs/delete_blob.mdx ===
title: ‘Delete Blob’ openapi: delete /api/v1/blobs//
Delete a specific memory blob from a user’s storage. This operation permanently removes the blob data from the system.=== api-reference/blobs/get_all_data.mdx ===
title: ‘Get User Blobs’ openapi: get /api/v1/users/blobs//
Retrieve all memory blobs of a specific type for a user. This endpoint supports pagination to manage large sets of memory data efficiently. Query Parameters:- page: Page number (default: 0)
- page_size: Number of items per page (default: 10)
=== api-reference/blobs/get_blob.mdx ===
title: ‘Get Blob’ openapi: get /api/v1/blobs//
Retrieve a specific memory blob for a user. This endpoint returns the detailed content and metadata of a single memory blob.=== api-reference/blobs/insert_data.mdx ===
title: ‘Insert Data to a User’ openapi: post /api/v1/blobs/insert/
Insert new memory data (blob) for a specific user. This endpoint handles the storage of memory data and automatically updates the user’s memory buffer. The inserted data will be processed and integrated into the user’s long-term memory profile. Memobase plans to support the following blob types:ChatBlob: ✅ supported.DocBlob: 🚧 in progressImageBlob: 🚧 in progressCodeBlob: 🚧 in progressTranscriptBlob: 🚧 in progress
=== api-reference/blobs/modal/chat.mdx ===
title: ‘ChatBlob’
ChatBlob is for user/AI messages. Memobase will automatically understand and extract the messages into structured profiles. An example of ChatBlob is below:Example to insert ChatBlob
Example to insert ChatBlob
role: user or assistantcontent: message contentalias: optional. You can set the name of the character(user or assistant), it will reflect in the memory profile.created_at: optional. You can set the date of the message.
=== api-reference/buffer/flush.mdx ===
title: ‘Flush Buffer’ openapi: post /api/v1/users/buffer//
Flush the memory buffer for a specific user and buffer type. This endpoint ensures all pending memory operations are processed and committed to long-term storage.=== api-reference/buffer/size.mdx ===
title: ‘Get Buffer Ids’ openapi: get /api/v1/users/buffer/capacity//
Get the ids of the buffer for a specific user and buffer type. This endpoint returns buffer ids.=== api-reference/events/delete_event.mdx ===
title: ‘Delete User Event’ openapi: delete /api/v1/users/event//
Delete a user event.=== api-reference/events/get_events.mdx ===
title: ‘Get User Recent Events’ openapi: get /api/v1/users/event/
Returns a list of the user’s most recent events, ordered by recency.=== api-reference/events/search_event_gists.mdx ===
title: ‘Search Event Gists’ openapi: get /api/v1/users/event_gist/search/
Search event gists by query. Event gist is a fraction of User Event. For example, if a user event has theevent_tips:
- A // info- B // schedule- C // reminder
=== api-reference/events/search_events.mdx ===
title: ‘Search Events’ openapi: get /api/v1/users/event/search/
Search events by query.=== api-reference/events/update_event.mdx ===
title: ‘Update User Event’ openapi: put /api/v1/users/event//
Update a user event with data.=== api-reference/experimental/import_memory.mdx ===
title: ‘Import Memory from Text’ openapi: POST /api/v1/users/profile/import/
=== api-reference/experimental/proactive_topic.mdx ===
title: ‘Proactive Topics’ openapi: “POST /api/v1/users/roleplay/proactive/”
=== api-reference/overview.mdx ===Memobase API Overview
Memobase provides a powerful set of APIs for integrating user profile-based memory capabilities into your GenAI applications. Our APIs are designed to help your AI remember users through efficient memory management and profile generation.Key Features
- User Memory Management: Create, retrieve, update, and delete user memories with ease
- Profile Generation: Automatically generate user profiles from conversations and interactions
- Buffer System: Efficient memory processing with buffer zones for recent interactions
- Customizable Profiles: Define the aspects you want Memobase to collect about your users
- Secure Authentication: API token-based access control for your data
API Structure
Our API is organized into several main categories:-
User APIs: Manage user entities and their data
- Create and manage users
- Update user information
- Delete user accounts
-
Data APIs: Handle data operations
- Insert blobs
- Get blobs
- Delete blobs
- Get all blobs
-
Profile APIs: Access and manage user profiles
- Get user profiles
- Delete specific profiles
- Customize profile generation
Authentication
All API requests require authentication using Bearer token authentication. Include your API token in the Authorization header of each request:Getting Started
To begin using the Memobase API, you’ll need to:-
Set up your Memobase backend server
- Default URL:
http://localhost:8019 - Default token:
secret
- Default URL:
-
Make your first API call:
- Start exploring the APIs!
Data Processing
By default, Memobase processes and removes raw memory blobs after generating profiles. This ensures:- Efficient storage usage
- Privacy-focused data handling
- Relevant information extraction
=== api-reference/profiles/add_profile.mdx ===
title: ‘Add User Profile’ openapi: post /api/v1/users/profile/
This endpoint allows you to add new profile entries to a user’s long-term memory.=== api-reference/profiles/delete_profile.mdx ===
title: ‘Delete User Profile’ openapi: delete /api/v1/users/profile//
Delete a specific profile from a user’s long-term memory. This endpoint allows you to remove individual profile entries that are no longer needed.=== api-reference/profiles/profile.mdx ===
title: ‘Get User Profile’ openapi: get /api/v1/users/profile/
Retrieve the real-time user profiles for long-term memory. This endpoint provides access to the consolidated profile information generated from user’s memory data.=== api-reference/profiles/update_profile.mdx ===
title: ‘Update User Profile’ openapi: put /api/v1/users/profile//
Update a specific profile in a user’s long-term memory.=== api-reference/project/get_profile_config.mdx ===
title: ‘Get Current Profile Config’ openapi: get /api/v1/project/profile_config
Returns the current profile config, Empty if using the default profile config inconfig.yaml.
=== api-reference/project/get_usage.mdx ===
title: ‘Get Project Daily Usage’ openapi: get /api/v1/project/usage
Get the daily usage statistics of a project over the last N days. This endpoint provides detailed usage metrics including:- Total blob insertions per day
- Successful blob insertions per day
- Input tokens consumed per day
- Output tokens consumed per day
=== api-reference/project/get_users.mdx ===
title: ‘Get Project Users’ openapi: get /api/v1/project/users
Get the users of a project with various filtering and ordering options. This endpoint allows you to:- Search users by username
- Order results by different fields (updated_at, profile_count, event_count)
- Control sort direction (ascending or descending)
- Paginate results with limit and offset
=== api-reference/project/update_profile_config.mdx ===
title: ‘Update Current Profile Config’ openapi: post /api/v1/project/profile_config
Updates the current profile config. Checkout more details in Profile Config. Below is an example of your profile config:config.yaml you used to start Memobase server,
it only affect the profile slots.
=== api-reference/prompt/get_context.mdx ===
title: ‘Get User Personalized Context’ openapi: get /api/v1/users/context/
Return a string of the user’s personalized context you can directly insert it into your prompt. Format:=== api-reference/users/create_user.mdx ===
title: ‘Create User’ openapi: post /api/v1/users
Create a new user in the memory system with additional user-specific data. This endpoint initializes a new user entity that can store and manage memories.=== api-reference/users/delete_user.mdx ===
title: ‘Delete User’ openapi: delete /api/v1/users/
Remove a user and all associated data from the memory system. This operation permanently deletes the user’s profile and memories.=== api-reference/users/get_user.mdx ===
title: ‘Get User’ openapi: get /api/v1/users/
Retrieve user information and associated data. This endpoint returns the user’s profile and configuration data.=== api-reference/users/update_user.mdx ===
title: ‘Update User’ openapi: put /api/v1/users/
Update an existing user’s data. This endpoint allows you to modify user-specific information and settings.=== api-reference/utility/healthcheck.mdx ===
title: ‘Health Check’ openapi: get /api/v1/healthcheck
Check if your memobase server is set up correctly and all required services (database, Redis) are available and functioning properly.=== api-reference/utility/usage.mdx ===
title: ‘Get Project Usage’ openapi: get /api/v1/project/billing
Get the usage of your project.=== cost.mdx ===
title: Performance and Cost
Overview
Memobase is designed for high performance and cost-efficiency.- Query Performance: Queries are extremely fast because Memobase returns a pre-compiled user profile, eliminating the need for on-the-fly analysis.
- Controllable Costs: You can manage costs by controlling the size of user profiles. This is done by configuring the number of profile slots and the maximum token size for each.
- Insertion Efficiency: New data is added to a buffer and processed in batches. This approach amortizes the cost of AI analysis, making insertions fast and inexpensive.
- Learn to configure the buffer here.
Comparison vs. Other Solutions
Memobase vs. mem0
- Cost: Memobase is approximately 5x more cost-effective.
- Performance: Memobase is roughly 5x faster.
- Memory Quality: mem0 provides gist-based memories, while Memobase delivers structured and organized profiles for more predictable recall.
=== features.mdx ===
title: Features
🚀 What is Memobase?
- AI-Powered Backend: Memobase is a backend service designed to manage dynamic user profiles for your AI applications.
- Automated Profile Building: It analyzes user interactions to build rich, structured profiles, capturing everything from basic demographics to specific user preferences.
- Personalized Experiences: Leverage these detailed profiles to create highly personalized and engaging user experiences.
- Scalable & Fast: Built for performance, Memobase efficiently handles user data at any scale.
🖼️ User Profiles as Memory
- Custom Memory Slots: Define what your AI should remember. Whether it’s a user’s favorite color, their dog’s name, or professional background, you can create custom fields for any data point.
- Structured & Predictable: User profiles are organized into a clear topic/subtopic structure (e.g.,
interests/movies), making them easy to parse and use in your AI logic. - Simple & Powerful: This human-readable format is robust enough to store a lifetime of user memories.
👌 Core Use Cases
- Long-Term Memory: Give your AI the ability to remember past interactions and user details.
- User Analysis: Gain deep insights into user behavior and preferences to enhance your application.
- Targeted Content: Deliver personalized content, recommendations, and promotions that resonate with your users.
🤔 How It Works
- Data Blobs: Memobase stores user data in flexible “blobs.” You can insert, retrieve, and delete these data chunks as needed.
- Buffering System: Recent data is held in a temporary buffer before being processed and integrated into the long-term user profile. This flush can be triggered automatically or manually.
- Profile Evolution: Over time, Memobase constructs comprehensive user profiles that enable your application to deliver truly personalized experiences.
💰 Performance and Cost
For details on performance benchmarks and pricing, see our Cost page.=== features/async_insert.mdx ===
title: Asynchronous Operations
Memobase supports asynchronous operations for inserting and flushing data. Offloading these tasks to background processes improves your application’s performance and responsiveness by preventing memory operations from blocking the main thread. When you perform an asynchronous insert or flush, the data is queued for processing, and the method returns immediately. This allows your application to continue executing while Memobase handles the data in the background.SDK Examples
Here’s how to use both synchronous and asynchronous operations in our SDKs:=== features/context.mdx ===
title: Retrieving the Memory Prompt
Memobase automatically extracts and structures various types of memories from user interactions, including:- User Profile: Key-value attributes describing the user (e.g., name, location, preferences).
- User Events: Significant occurrences and interactions from the user’s history.
context() API to retrieve this information as a structured string, ready to be injected directly into your LLM prompts.
Basic Usage
The simplest way to get a user’s context is to call thecontext() method on a user object.
Context-Aware Retrieval
To make the retrieved context more relevant to the ongoing conversation, you can provide recent chat messages. Memobase will perform a semantic search to prioritize the most relevant historical events, rather than simply returning the most recent ones.Controlling Context Size
You can manage the size and cost of your prompts by limiting the token count of the retrieved context using themax_tokens parameter.
max_tokens limit applies to the profile and event content, not the final formatted string. If you use a large custom prompt template, the final output may still exceed the limit.
Advanced Filtering
Thecontext() API offers several parameters for fine-grained control:
prefer_topics,only_topics: Prioritize or exclusively include certain profile topics.max_subtopic_size: Limit the number of sub-topics returned per topic.profile_event_ratio: Adjust the balance between profile and event information.time_range_in_days: Filter events to a specific time window.customize_context_prompt: Provide a custom template for the final output string.
get_context.
=== features/event/event.mdx ===
title: Event Fundamentals
Memobase automatically tracks key events and memories from user interactions, creating a chronological record of their experiences.Event Structure
Each event object contains the following information:- Event Summary (Optional): A concise summary of the user’s recent interaction. Learn more about Event Summaries.
- Event Tags (Optional): Semantic tags that categorize the event (e.g.,
emotion::happy,goal::buy_a_house). Learn how to design custom tags. - Profile Delta (Required): The specific profile slots that were created or updated during this event.
- Created Time (Required): The timestamp of when the event occurred.
=== features/event/event_search.mdx ===
title: Searching Events
User events in Memobase are stored as a sequence of experiences, each enriched with tags. By default, events are retrieved in chronological order, but Memobase also provides a powerful search function to find events based on a query.Semantic Search
You can perform a semantic search to find events related to a specific topic or concept.emotion tag, or events that updated profile slots related to emotion.
For a detailed list of search parameters, please refer to the API documentation.
Search Event Gists
A user event is a group of user infos happened in a period of time. So when you need to search for specific facts or infos, you may need a more fine-grained search. In Memobase, we call itevent_gist. event_gist is a fraction of user_event that only contains one fact, schedule, or reminder of user.
So if you want to search particular things of user, without the context of other infos, you can use search_event_gist to conduct a search:
=== features/event/event_summary.mdx ===
title: Customizing Event Summaries
For each event, Memobase generates a concise summary of the recent user interaction. This summary serves as the primary input for the subsequent extraction of profile updates and event tags, making its quality crucial for the overall effectiveness of the memory system. Memobase allows you to customize the prompt used for generating these summaries, giving you greater control over the focus and quality of the extracted information.Customizing the Summary Prompt
You can add a custom instruction to the summary generation process via theevent_theme_requirement field in your config.yaml file. For example, if you want the summary to focus on the user’s personal information rather than their instructions to the AI, you can configure it as follows:
config.yaml
=== features/event/event_tag.mdx ===
title: Using Event Tags
Event tags are a powerful feature for automatically categorizing user events with semantic attributes. You can use them to enrich event data and track user behavior over time across various dimensions, such as:- Emotion (
happy,frustrated) - Life Goals (
buying_a_house,learning_a_skill) - Relationships (
new_friend,family_mention)
Configuring Event Tags
By default, no event tags are recorded. You must define the tags you want to track in yourconfig.yaml file:
config.yaml
description field is crucial for helping the AI accurately understand when to apply each tag.
Retrieving Event Tags
Event tags are returned as part of the event object when you retrieve a user’s event history.Searching Events by Tag
You can also search for events that have specific tags applied.=== features/message.mdx ===
title: Customizing Chat Messages
Memobase builds user memories from the chat interactions you provide. However, simpleuser and assistant roles are not always sufficient to capture the full context. Memobase allows you to add custom metadata to your messages to handle more complex scenarios.
Custom Timestamps
It’s important to distinguish between two types of timestamps in Memobase:- External Timestamp: The time a memory is stored or updated in the database.
- Internal Timestamp: The time an event actually occurred according to the content of the memory itself (e.g., a birthday, a travel date).
created_at field.
This is useful for importing historical data or for applications set in fictional timelines.
"In the year 32637, the user started a rebellion."
You can use any date or time format; Memobase will extract the time at the appropriate granularity.
Character Aliases
For more complex interactions, such as multi-character role-playing, you can assign names oralias values to the user and assistant roles.
"The Emperor wished to declare war, but The Advisor suggested rest instead."
=== features/profile/profile.mdx ===
title: Profile Fundamentals
Memobase serves as a user profile backend for LLM applications, enabling them to track and update specific user attributes over time.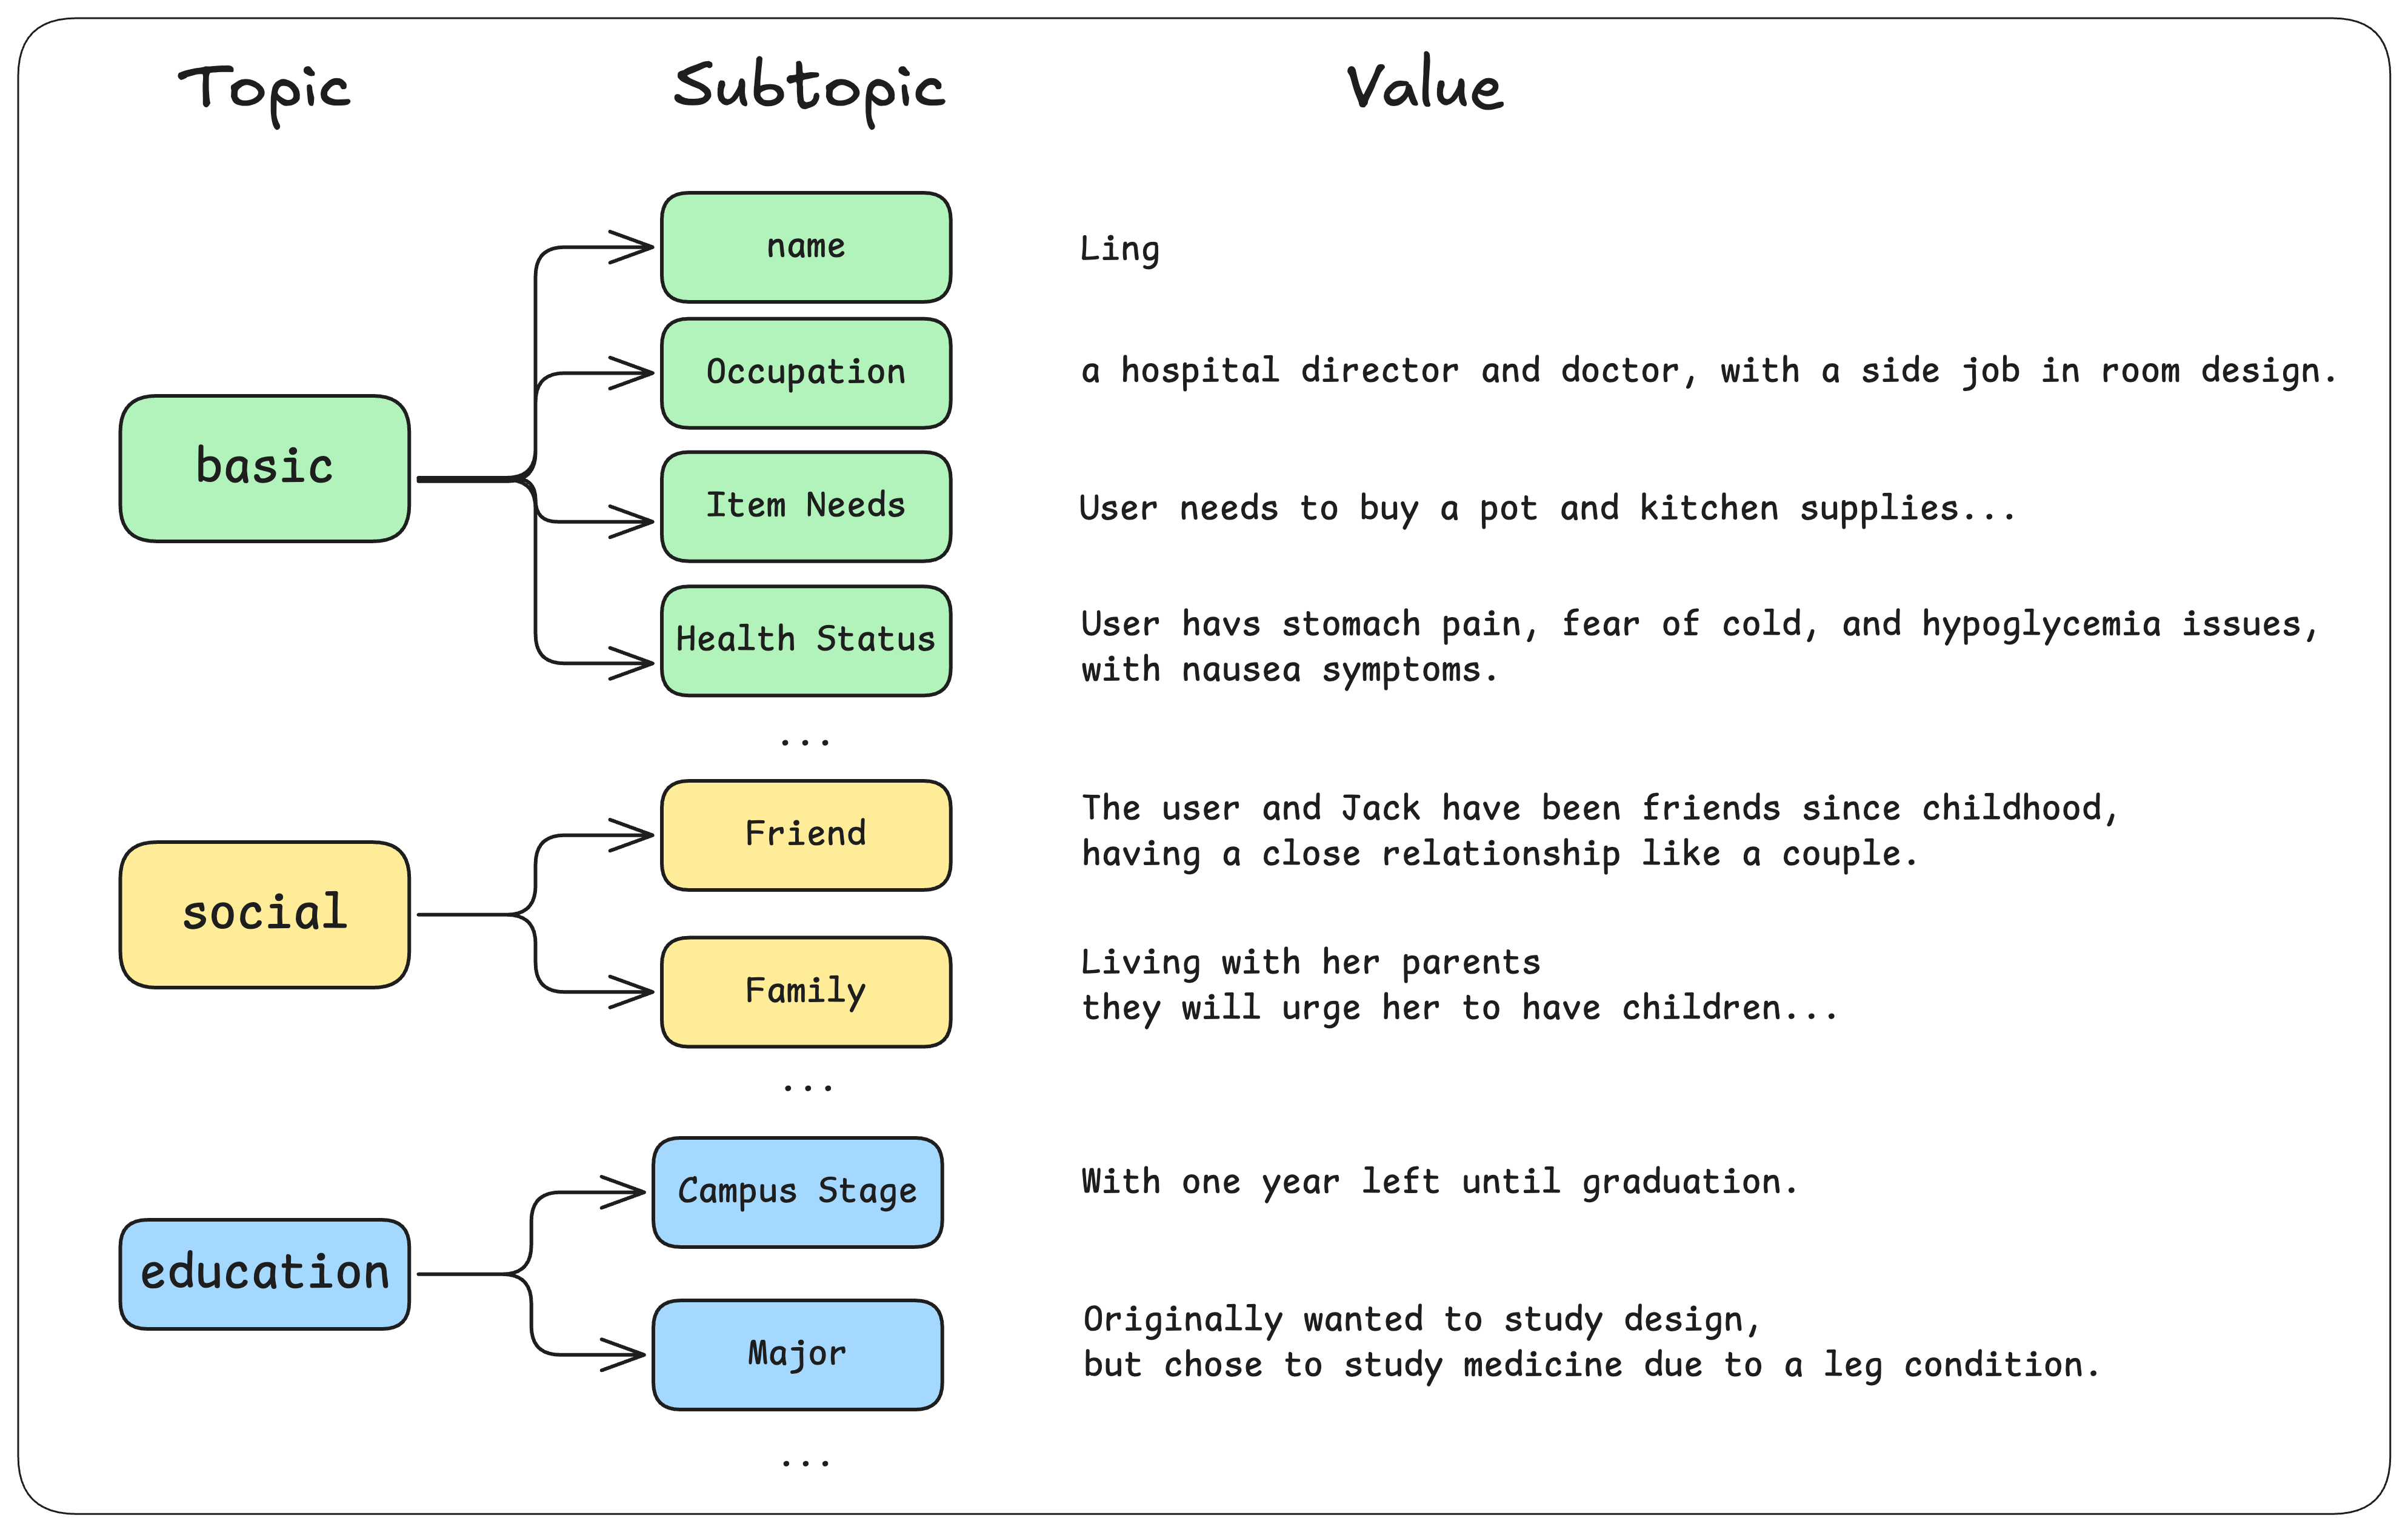
Locating the config.yaml File
Memobase uses a config.yaml file for backend configuration. You can find this file at src/server/api/config.yaml in your self-hosted instance. A typical configuration looks like this:
Understanding Profile Slots
Memobase comes with a default schema of profile slots, such as:additional_user_profiles field in config.yaml:
overwrite_user_profiles field instead.
For detailed instructions on formatting profile slots, see Profile Slot Configuration.
=== features/profile/profile_config.mdx ===
title: Profile Validation and Strictness
Auto-Validation
By default, Memobase validates all new profile information before saving it. This process serves two main purposes:- Ensures Meaningful Data: It filters out low-quality or irrelevant information that the LLM might generate, such as “User has a job” or “User did not state their name.”
- Maintains Schema Adherence: It verifies that the extracted information aligns with the descriptions you have defined for your profile slots.
profile_validate_mode to false in your config.yaml:
config.yaml
Strict Mode
By default, Memobase operates in a flexible mode, allowing the AI to extend your defined profile schema with new, relevant sub-topics it discovers during conversations. For example, if your configuration is:config.yaml
Possible Profile Output
config.yaml
config.yaml.
=== features/profile/profile_desc.mdx ===
title: Configuring Profile Slots
Memobase allows for detailed customization of how profile slots are created and updated.Instructing Profile Creation
Memobase uses atopic and sub_topics structure to define a profile slot. For example:
description fields to give the AI more context and ensure it tracks the information you need with greater accuracy.
description field is optional but highly recommended for achieving precise data extraction.
Instructing Profile Updates
Memobase not only creates profile slots but also maintains them over time. When a user provides new information, Memobase must decide how to update the existing data. For example, if a user mentions a new job, thework/start_date slot needs to be updated:
- Old Value:
2020-01-01 - New Information: User starts a new job in 2021.
- Default Update: The value is replaced with
2021-01-01.
update_description to the profile slot. For instance, if you wanted to keep a record of the user’s first-ever job start date, you could configure it like this:
start_date instead of overwriting it.
=== features/profile/profile_filter.mdx ===
title: Filtering Profiles at Retrieval
Memobase tracks and models a comprehensive profile for each user. You can use this profile in your AI prompts to provide a global understanding of the user. While user profiles are generally concise, it is good practice to control the final size of the context you inject into your prompts. Memobase provides several parameters to help you filter profiles at retrieval time.Rule-Based Filtering
You can pass rules to the Memobase API to filter profiles based on specific criteria:max_token_size: Sets the maximum token size for the entire profile context.prefer_topics: Ranks specified topics higher, making them more likely to be included in the final output.only_topics: Includes only the specified topics, filtering out all others.
Context-Aware Filtering
Memobase also offers a powerful semantic filtering capability. By passing the latest chat messages to the API, you can retrieve only the most “contextual” or relevant profiles for the current conversation. This is more advanced than a simple embedding-based search. Memobase uses the LLM to reason about which profile attributes would be most helpful for generating the next response. For example, if a user says, “Find some restaurants for me,” Memobase will intelligently rank profiles likecontact_info::city, interests::food, and health::allergies higher in the results.
=== features/profile/profile_search.mdx ===
title: Context-Aware Profile Search
While Memobase is designed to provide a comprehensive, global context for each user with very low latency, there are times when you need to search for specific information within a user’s profile. Memobase provides a powerful, context-aware search method to filter out irrelevant memories and retrieve only what’s needed for the current turn of the conversation.How Profile Search Works
Unlike simple keyword or semantic matching, Memobase’s profile search uses the LLM to perform a feature-based analysis. It reasons about what aspects of a user’s profile are relevant to their latest query. For example, if a user asks, “Can you recommend a good restaurant?”, Memobase doesn’t just search for the term “restaurant.” Instead, it identifies key features that would help answer the question, such as:basic_info::location: To determine the city for the restaurant search.interests::food: To understand the user’s cuisine preferences.health::allergies: To know what ingredients to avoid.
Important Considerations
- Latency: Profile search is a powerful but computationally intensive operation. It can add 2-5 seconds to your response time, depending on the size of the user’s profile. Use it judiciously.
- Cost: Each profile search consumes Memobase tokens (roughly 100-1000 tokens per call), which will affect your usage costs.
=== introduction.mdx ===
title: What is Memobase?
Struggling with short-term memory in your AI applications? Memobase is the solution. It’s a fast, scalable, long-term user memory backend for your AI, helping you build applications that remember and understand their users.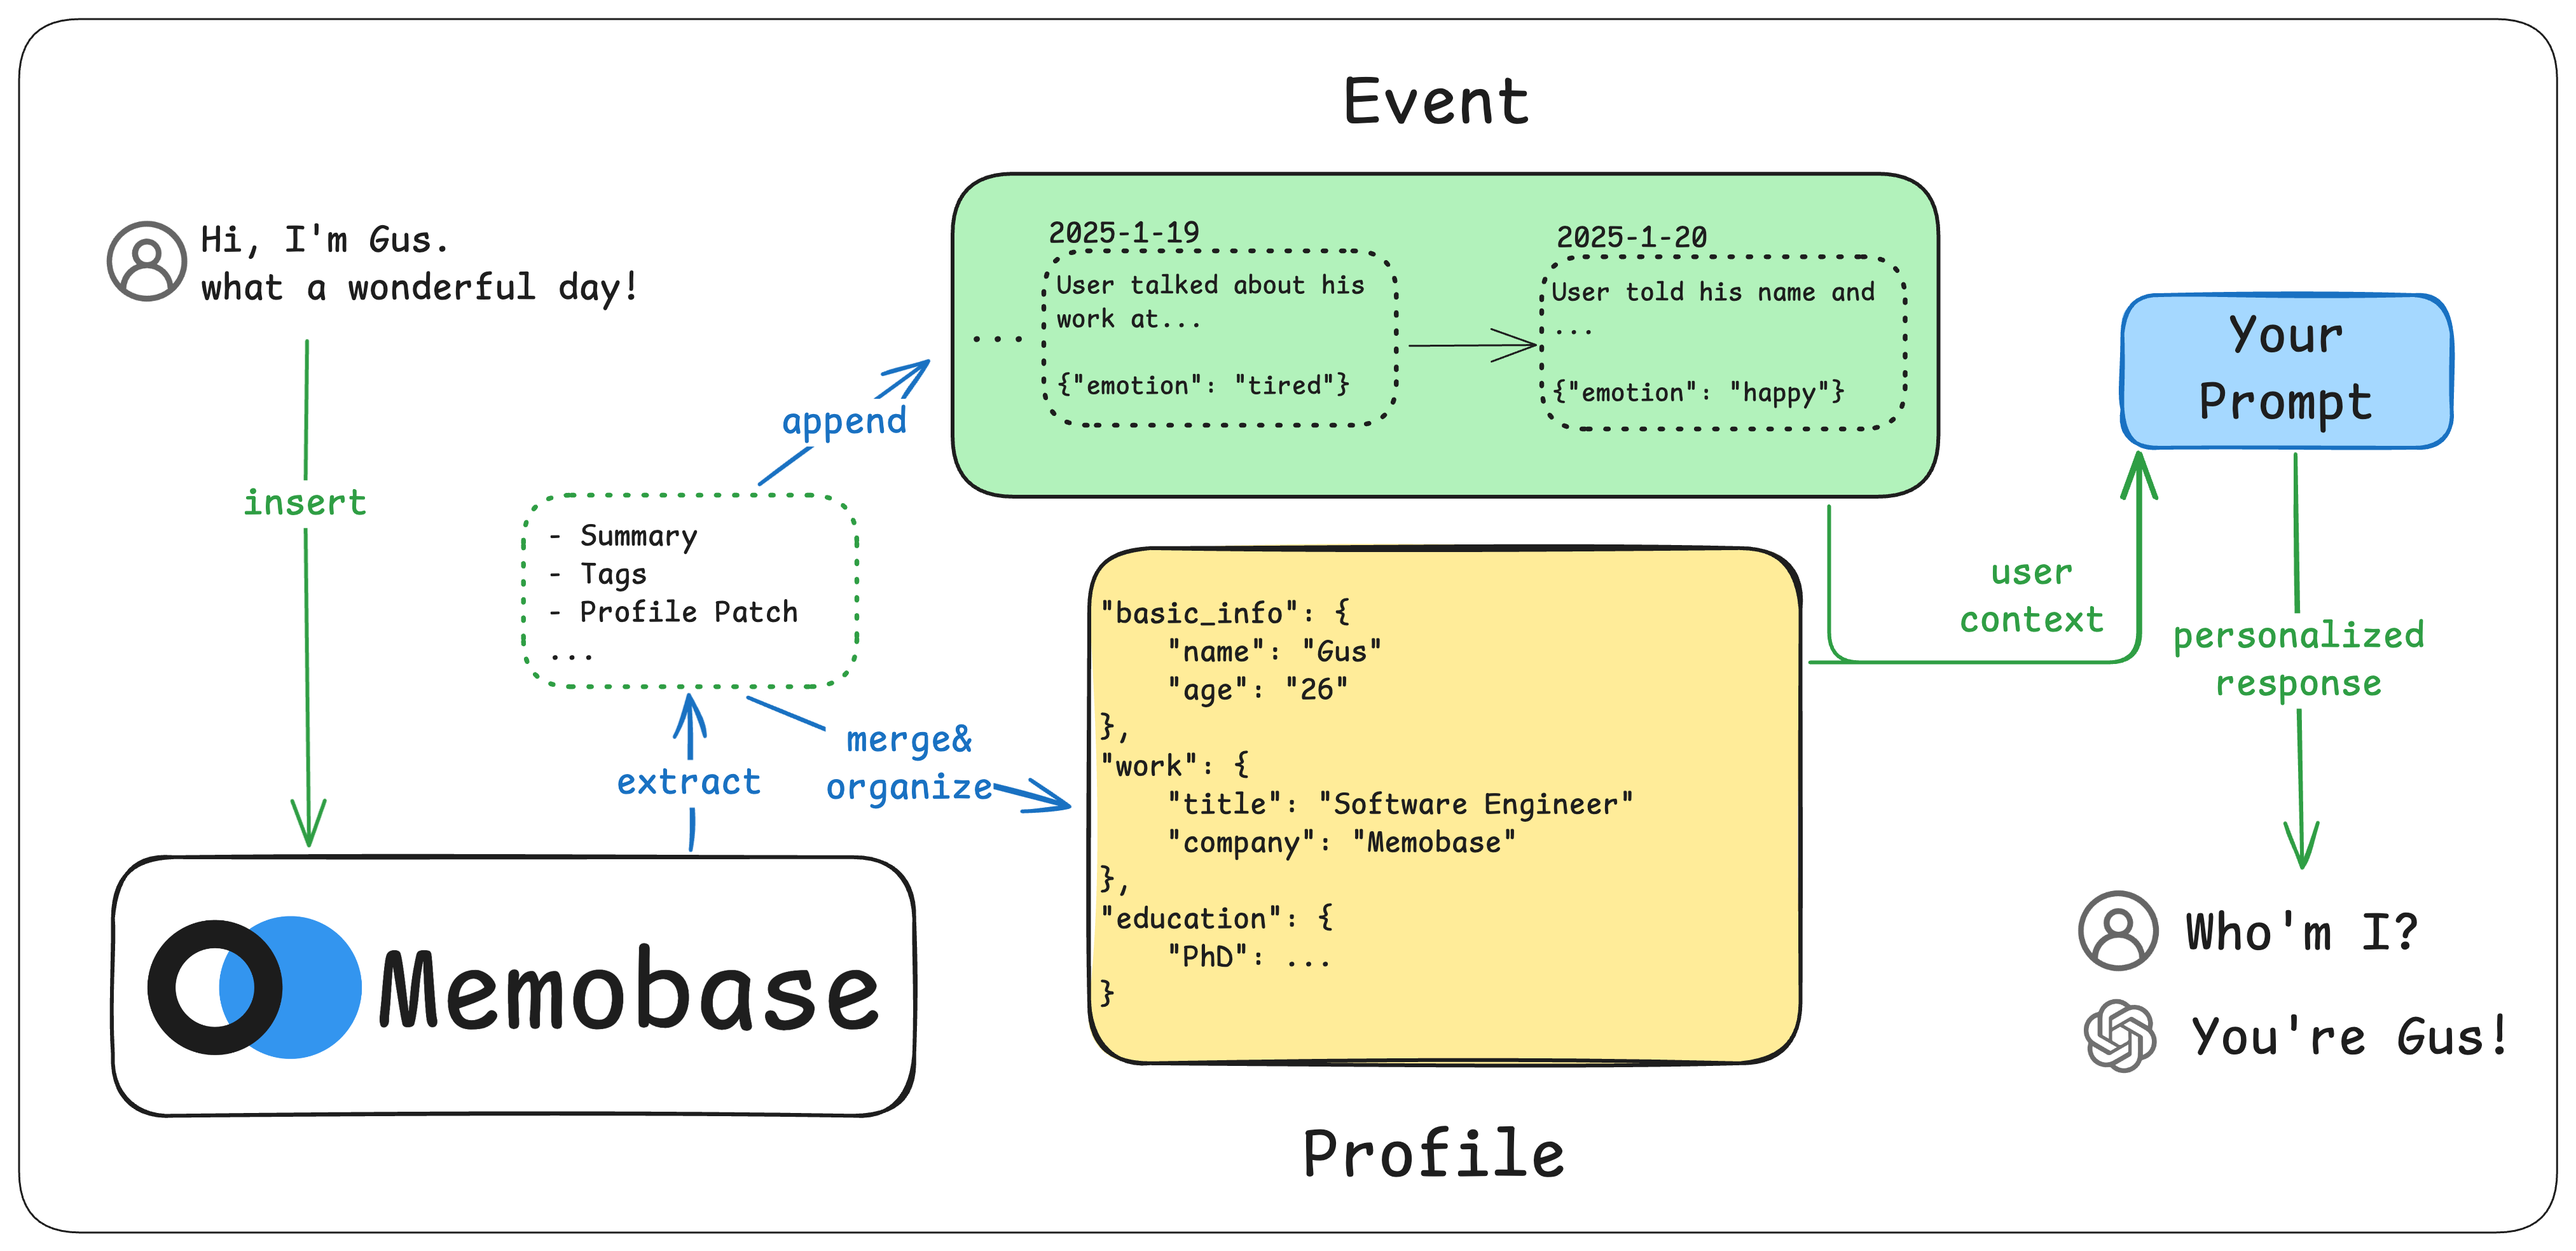
- Profile Memory - Understand who the user is.
- Event Memory - Track what has happened in the user’s life.
- Schedule Memory - Manage the user’s calendar (Coming Soon).
- Social Memory - Map the user’s relationships (Coming Soon).
Get Started
Quickstart
Integrate Memobase with just a few lines of code.
Why Memobase
Learn what makes Memobase unique.
API Reference
Explore our comprehensive API documentation.
Vision
Our vision is to provide a powerful second brain for AI applications, enabling them to build lasting and meaningful user relationships.=== practices/bad.mdx ===
title: Troubleshooting Common Issues
Issue: Too Much Useless Information is Saved
If your user profiles are cluttered with irrelevant data, follow these steps:- Define Profile Scope: Start by clearly defining what information each user profile should contain.
- Refine Slot Descriptions: Provide clear and specific descriptions for each profile slot in your
config.yaml. This guides the AI on what to extract. Learn more. - Enable Strict Mode: If the issue persists, enable strict mode to ensure the AI only saves information that directly matches your defined profile slots.
Issue: Relevant Information is Not Being Saved
If the AI fails to extract important details, try the following:- Simplify Descriptions: Your profile descriptions might be too complex for the LLM to interpret. Try simplifying them to be more direct.
- Disable Validation: If information is still not being captured, you can disable profile validation to allow for more flexible data extraction.
Issue: Profile Data is Inaccurate or Wrong
To improve the accuracy of the information stored in profiles:- Add Detail to Descriptions: Enhance your profile descriptions with more context and examples to ensure the AI understands the data format and meaning correctly.
- Use Update Instructions: For each profile slot, add an update description. This tells Memobase how to intelligently merge new information with existing data, which helps maintain accuracy over time.
=== practices/openai.mdx ===
title: Using Memobase with the OpenAI API

Setup
-
Install SDKs: Ensure both the Memobase and OpenAI Python SDKs are installed.
-
Initialize Clients: Create instances of both the OpenAI and Memobase clients.
You can find your
project_urlandapi_keyafter setting up your backend.
Patch Memory
Apply the Memobase memory patch to your OpenAI client instance with a single function call.Usage
-
To enable memory, simply add a
user_idto your standard API call. The client will automatically handle the memory context. -
If no
user_idis passed, the client functions exactly like the original OpenAI client. -
By default, memory processing is not immediate. User interactions are collected in a buffer to optimize performance. You can manually trigger processing using the
flushmethod:
Verifying Memory Retention
Once a user’s information is captured, it can be recalled in subsequent, separate conversations.How It Works
Theopenai_memory function wraps the OpenAI client with two key actions:
- Before Request: It retrieves the user’s memory context from Memobase and injects it into the prompt.
- After Response: It saves only the latest user query and assistant response to the memory buffer.
Your name is Gus., Memobase will only store the last exchange. This is equivalent to:
Advanced Usage
Custom Parameters
You can pass additional arguments toopenai_memory to customize its behavior:
max_context_size: Controls the maximum token size of the injected memory context. Defaults to1000.additional_memory_prompt: Provides a meta-prompt to guide the LLM on how to use the memory.
Patched Methods
The patched client includes new helper methods:client.get_memory_prompt("user_id"): Returns the current memory prompt that will be injected for a given user.client.flush("user_id"): Immediately processes the memory buffer for a user. Call this if you need to see memory updates reflected instantly.
=== practices/tips.mdx ===
title: Best Practices & Tips
This guide provides tips for effectively using Memobase in your applications.Configuring User Memory
You can define the structure of user profiles by configuring topics and sub-topics in yourconfig.yaml file. This tells Memobase what kind of information to track.
Integrating Memory into Prompts
There are two primary ways to retrieve and use a user’s memory.Method 1: Profile API (Manual Assembly)
The Profile API returns a structured JSON object containing the user’s profile data. You are responsible for formatting this JSON into a string and inserting it into your prompt. Key Considerations:- Context Length: Control the token count of the memory context to manage cost and performance. Use
max_token_sizeto set a hard limit andmax_subtopic_sizeto limit the number of sub-topics per topic. - Topic Filtering: Use
only_topicsto retrieve specific profile sections orprefer_topicsto prioritize the most important information.
Method 2: Context API (Automated Assembly)
The Context API returns a pre-formatted string containing both the user’s profile and recent events, ready to be injected directly into your system prompt. It uses a template like this:Flushing the Memory Buffer
Memobase uses a buffer to collect user interactions. Aflush operation processes this buffer and updates the long-term memory. Flushing occurs automatically when:
- The buffer exceeds a certain size.
- The buffer has been idle for a set period.
flush API. It is best practice to call flush at the end of a user session or conversation.
User ID Management
A single user in your application can correspond to multiple Memobase users. This is useful for creating segmented memories.- Example: AI Role-Playing: If a user interacts with multiple AI agents (e.g., a history tutor and a creative writer), you can create a separate Memobase user for each agent. This keeps the memories for each role distinct.
Enriching Conversation Data
You can add metadata to the messages you insert to provide more context for memory extraction.- Speaker Alias: Use
aliasto specify the name of the AI assistant in the conversation. - Timestamps: Provide a
created_attimestamp for each message so Memobase can build a timeline of events.
=== quickstart.mdx ===
title: ‘Quickstart’
Ready to give your AI a memory boost? Here’s how to get started.Patch OpenAI
Upgrade your existing OpenAI setup with Memobase memory.
Client-Side
Use our SDKs or APIs to connect your app to a Memobase backend.
Server-Side
Deploy your own Memobase backend. It’s easier than assembling IKEA furniture.
Memobase Client
Step 1: Get Prepped
Install the SDK
Install the SDK
Find Your Project URL and Token
Find Your Project URL and Token
You’ll get these when you set up your backend. Keep them handy.
Step 2: Connect to the Backend
Instantiate the Client
Instantiate the Client
Test the Connection (Ping!)
Test the Connection (Ping!)
Step 3: User Management
Create, read, update, and delete users.Create a User
Create a User
Update a User
Update a User
Get a User
Get a User
Delete a User
Delete a User
Step 4: Manage User Data
Now that you have a user, let’s give them some memories.Insert Data (e.g. Chats)
Insert Data (e.g. Chats)
Get Data
Get Data
Delete Data
Delete Data
Step 5: Memory Operations
This is where the magic happens. Memobase extracts and stores memories for each user.flush: User data is held in a buffer. If the buffer gets too large or remains idle, it gets processed. You can also trigger this manually.
Flush (e.g., after a chat session ends)
Flush (e.g., after a chat session ends)
profile: Get the memory profile of a user.
Get User Profile
Get User Profile
- Form a personalized memory prompt:
Example Personalized Prompt
Example Personalized Prompt
Memobase Backend
We offer an open-source solution with a Docker backend to launch your own instance. You can usedocker-compose to launch the backend in one command.
Memobase Cloud
We also offer a hosted cloud service, with free tier and nice dashboard.=== references/async_client.mdx ===
title: Async Python Client
Memobase also provides an async client inpython SDK, it just the same as the sync client, but every method is async:
=== references/cloud_config.mdx ===
title: Cloud Configuration
If you’re using Memobase on cloud, you can refer to those sections to configure your memory backend: In Memobase Cloud, we don’t accept any LLM/Embedding model configuration for security reasons, all the LLM/Embedding costs are counted into Memobase Tokens.=== references/local_config.mdx ===
title: Self-Hosted Configuration
If you develop Memobase locally, you can use aconfig.yaml file to configure Memobase Backend.
Full Explanation of config.yaml
We use a single config.yaml file as the source to configure Memobase Backend. An example is like this:
Configuration Categories
Storage and Performance
persistent_chat_blobs: boolean, default tofalse. If set totrue, the chat blobs will be persisted in the database.buffer_flush_interval: int, default to3600(1 hour). Controls how frequently the chat buffer is flushed to persistent storage.max_chat_blob_buffer_token_size: int, default to1024. This is the parameter to control the buffer size of Memobase. Larger numbers lower your LLM cost but increase profile update lag.max_profile_subtopics: int, default to15. The maximum subtopics one topic can have. When a topic has more than this, it will trigger a re-organization.max_pre_profile_token_size: int, default to128. The maximum token size of one profile slot. When a profile slot is larger, it will trigger a re-summary.cache_user_profiles_ttl: int, default to1200(20 minutes). Time-to-live for cached user profiles in seconds.llm_tab_separator: string, default to"::". The separator used for tabs in LLM communications.
Timezone Configuration
use_timezone: string, default tonull. Options include"UTC","America/New_York","Europe/London","Asia/Tokyo", and"Asia/Shanghai". If not set, the system’s local timezone is used.
LLM Configuration
language: string, default to"en", available options{"en", "zh", "ja"}. The prompt language of Memobase.llm_style: string, default to"openai", available options{"openai", "doubao_cache"}. The LLM provider style.llm_base_url: string, default tonull. The base URL of any OpenAI-Compatible API.llm_api_key: string, required. Your LLM API key.llm_openai_default_query: dictionary, default tonull. Default query parameters for OpenAI API calls.llm_openai_default_header: dictionary, default tonull. Default headers for OpenAI API calls.best_llm_model: string, default to"gpt-4o-mini". The AI model to use for primary functions.summary_llm_model: string, default tonull. The AI model to use for summarization. If not specified, falls back tobest_llm_model.system_prompt: string, default tonull. Custom system prompt for the LLM.
Embedding Configuration
enable_event_embedding: boolean, default totrue. Whether to enable event embedding.embedding_provider: string, default to"openai", available options{"openai", "jina"}. The embedding provider to use.embedding_api_key: string, default tonull. If not specified and provider is OpenAI, falls back tollm_api_key.embedding_base_url: string, default tonull. For Jina, defaults to"https://api.jina.ai/v1"if not specified.embedding_dim: int, default to1536. The dimension size of the embeddings.embedding_model: string, default to"text-embedding-3-small". For Jina, must be"jina-embeddings-v3".embedding_max_token_size: int, default to8192. Maximum token size for text to be embedded.
Profile Configuration
Check what a profile is in Memobase here.additional_user_profiles: list, default to[]. Add additional user profiles. Each profile should have atopicand a list ofsub_topics.- For
topic, it must have atopicfield and optionally adescriptionfield:
- For each
sub_topic, it must have anamefield (or just be a string) and optionally adescriptionfield:
- For
overwrite_user_profiles: list, default tonull. Format is the same asadditional_user_profiles. Memobase has built-in profile slots likework_title,name, etc. For full control of the slots, use this parameter. The final profile slots will be only those defined here.profile_strict_mode: boolean, default tofalse. Enforces strict validation of profile structure.profile_validate_mode: boolean, default totrue. Enables validation of profile data.
Summary Configuration
minimum_chats_token_size_for_event_summary: int, default to256. Minimum token size required to trigger an event summary.event_tags: list, default to[]. Custom event tags for classification.
Telemetry Configuration
telemetry_deployment_environment: string, default to"local". The deployment environment identifier for telemetry.
Environment Variable Overrides
All configuration values can be overridden using environment variables. The naming convention is to prefix the configuration field name withMEMOBASE_ and convert it to uppercase.
For example, to override the llm_api_key configuration:
- Keeping sensitive information like API keys out of configuration files
- Deploying to different environments (development, staging, production)
- Containerized deployments where environment variables are the preferred configuration method
=== templates/dify.mdx ===
title: Dify Plugin for Long-Term Memory
Enhance your Dify applications with long-term memory by integrating the Memobase plugin. This guide will walk you through setting up and using the plugin to create more intelligent, context-aware AI agents.Prerequisites
First, find and install the open-source Memobase plugin from the Dify plugin marketplace.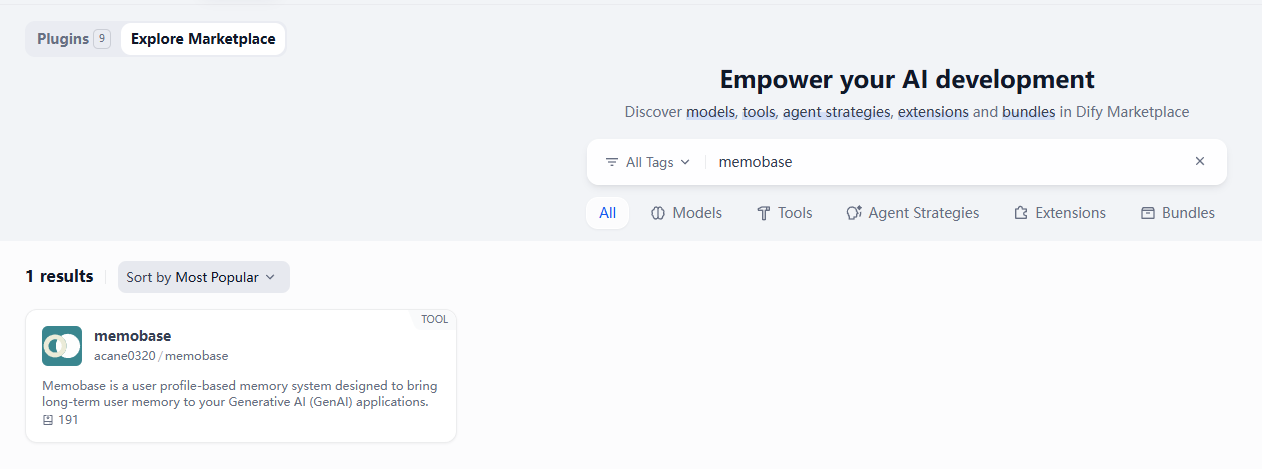
- Memobase Cloud: The easiest way to get started is by signing up for a managed instance on the Memobase dashboard.
- Self-Hosted: For more control, you can deploy your own instance. See the Memobase GitHub repository for instructions.
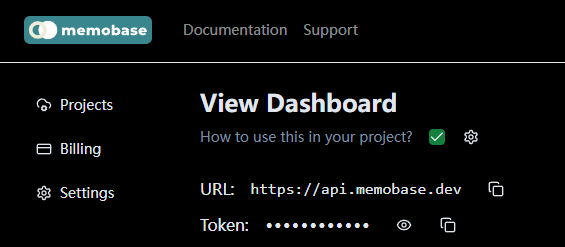
Plugin Configuration
To connect the plugin to your Memobase instance, you need to provide two credentials when adding the tool to your Dify application:- Memobase URL: The API endpoint for your instance (e.g.,
https://api.memobase.dev). - Memobase API Key: Your unique API key for authentication.
Using the Plugin in Dify Workflows
Once configured, you can use the plugin’s tools in your Dify workflows to:- Store and Recall Conversations: Persist dialogue for long-term context.
- Personalize Responses: Retrieve user profiles to tailor interactions.
- Access Past Events: Search and utilize historical user data.
- Manage Memory: Directly manipulate data within your Memobase instance from Dify.
Example Workflow
Here is a conceptual example of a Dify workflow that uses the Memobase plugin to retrieve and store memory:
=== templates/livekit.mdx ===
title: Building a Voice Agent with LiveKit and Memobase
Full CodeThis tutorial demonstrates how to build a voice agent with long-term memory using Memobase and LiveKit. This combination is ideal for applications like AI companions, customer support bots, and more.
Setup
-
Get API Keys:
- Memobase: Sign up at Memobase or run a local server.
- LiveKit: Get your
LIVEKIT_URL,API_KEY, andAPI_SECRETfrom the LiveKit Cloud Console. - Deepgram: Get your
DEEPGRAM_API_KEYfrom the Deepgram Console.
-
Environment Variables: Set up your environment variables.
-
Install Dependencies:
Code Breakdown
The full code is available here. We will be using the LiveKit Agents SDK v1.0. The core of the integration involves subclassing thelivekit.agents.Agent class and overriding the llm_node method to inject memory context from Memobase.
Agent Initialization
First, we initialize the Memobase client and define our custom agent class.Injecting Memory
Next, we override thellm_node method. This method is called just before the chat history is sent to the LLM. Here, we will retrieve the user’s memory from Memobase and add it to the system prompt.
rag_context string will contain the user’s profile and recent events, formatted and ready to be used by the LLM.
Running the Agent
Finally, we set up the entry point to run the agent.=== templates/mcp.mdx ===
title: Memobase and the Model Context Protocol (MCP)
Full CodeThis tutorial explains how to integrate Memobase with the Model Context Protocol (MCP) to provide your AI agents with persistent, long-term memory. By using the Memobase MCP server, your agents can store, retrieve, and search memories, making them stateful and context-aware across conversations.
What is MCP?
The Model Context Protocol is an open standard that allows AI assistants to securely connect to external data sources and tools. This enables them to access real-time information, execute functions, and maintain a persistent state, breaking free from the limitations of their training data.Why Memobase + MCP?
Traditional AI conversations are stateless. The Memobase MCP server changes this by providing:- Persistent Memory: Store conversation history and user preferences across sessions.
- Semantic Search: Find relevant context using natural language queries.
- User Profiles: Build a comprehensive understanding of users over time.
- Cross-Platform Compatibility: Works with any MCP-compatible client, such as Claude Desktop, Cursor, or Windsurf.
Setup
Prerequisites
Installation
We recommend usinguv for installation:
Environment Configuration
Configure your.env file:
Running the MCP Server
Start the server usinguv:
http://localhost:8050 with an SSE endpoint at /sse.
Client Integration
Configure your MCP client to connect to the Memobase server. For example, in Cursor, add this to your.cursor/mcp.json:
Available Tools
The Memobase MCP server exposes three powerful tools to your AI agent.1. save_memory
Stores information in long-term memory with semantic indexing.
2. search_memories
Finds relevant context using natural language queries.
3. get_user_profiles
Retrieves a comprehensive, structured user profile.
Real-World Example
Without Memory:User: “I prefer Python for backend development.” AI: “That’s great! Python is excellent for backend work.” Later… User: “What’s the best language for my new API?” AI: “There are many options, like Python, Node.js, or Go…”With Memobase MCP:
User: “I prefer Python for backend development.” AI: “Got it. I’ll remember your preference for Python.” (Memory saved: “User prefers Python for backend development”) Later… User: “What’s the best language for my new API?” AI: (Searches memories) “Based on your preference for Python, I’d recommend using FastAPI or Django.”
Conclusion
The Memobase MCP server transforms stateless AI interactions into intelligent, context-aware conversations. By providing persistent memory through a standardized protocol, you can build AI applications that learn, remember, and deliver truly personalized experiences.=== templates/ollama.mdx ===
title: Using Memobase with Ollama
Full CodeMemobase supports any OpenAI-compatible LLM provider as its backend. This tutorial demonstrates how to use Ollama to run a local LLM for both the Memobase server and your chat application.
Setup
1. Configure Ollama
- Install Ollama on your local machine.
- Verify the installation by running
ollama -v. - Pull a model to use. For this example, we’ll use
qwen2.5:7b.
2. Configure Memobase
To use a local LLM provider with the Memobase server, you need to modify yourconfig.yaml file.
Set the following fields to point to your local Ollama instance:
config.yaml
host.docker.internal to allow it to access the Ollama server running on your local machine at port 11434.
Code Breakdown
This example uses Memobase’s OpenAI Memory Patch for a clear demonstration.Client Initialization
First, we set up the OpenAI client to point to our local Ollama server and then apply the Memobase memory patch.Chat Function
Next, we create a chat function that uses the patched client. The key is to pass auser_id to trigger the memory functionality.
Testing the Memory
Now, you can test the difference between a stateless and a stateful conversation:=== templates/openai.mdx ===
title: OpenAI Client with User Memory
A key feature of Memobase is its ability to remember user preferences from conversation history. This tutorial demonstrates how to integrate this memory capability directly into the OpenAI client. While Memobase offers a simple patch for this, the following sections provide a detailed breakdown of the implementation.Setup
- Get API Keys: Obtain an API key from Memobase or run a local server.
- Configure Environment Variables:
- Install Dependencies:
Code Breakdown
- Wrap the OpenAI client: This allows us to intercept chat messages and inject memory context into prompts.
- Integrate Memobase APIs: Use the wrappers to store chat history and retrieve user memories.
- Test: Verify that the memory feature functions correctly.
You can find the full source code on GitHub.
Basic Setup
First, initialize the OpenAI and Memobase clients.Wrapping the OpenAI Client
We use duck typing to wrap the OpenAI client. This approach avoids altering the original client’s class structure.- It checks if the client has already been patched to prevent applying the wrapper multiple times.
- It replaces the standard
chat.completions.createmethod with our custom_sync_chatfunction, which will contain the memory logic.
The New chat.completions.create Method
Our new chat.completions.create method must meet several requirements:
- Accept a
user_idto enable user-specific memory. - Support all original arguments to ensure backward compatibility.
- Return the same data types, including support for streaming.
- Maintain performance comparable to the original method.
user_id are passed directly to the original method.
*args, **kwargs) to the original function, preserving its behavior. Memobase uses UUIDs to identify users, so we convert the provided user_id (which can be any string) into a UUID.
If a user_id is present, the workflow is:
- Get or create the user in Memobase.
- Inject the user’s memory context into the message list.
- Call the original
createmethod with the modified messages. - Save the new conversation to Memobase for future recall.
Enhancing Messages with User Context
Theuser_context_insert function injects the user’s memory into the prompt.
Saving Conversations
After receiving a response from OpenAI, we save the conversation to Memobase to build the user’s memory. This is done asynchronously using a background thread to avoid blocking.Non-Streaming Responses
For standard responses, we extract the content and save it.Streaming Responses
For streaming, we yield each chunk as it arrives and accumulate the full response. Once the stream is complete, we save the entire conversation.Utility Functions
The patch also adds several helper functions to the client for managing user memory:Usage Example
Here’s how to use the patched OpenAI client.Conclusion
This guide demonstrates a powerful method for adding persistent user memory to the OpenAI client. The patched client:- Is fully compatible: It works identically to the original client.
- Enables memory: Adds memory capabilities when a
user_idis provided. - Supports all modes: Handles both streaming and non-streaming responses.
- Is automatic: Seamlessly saves conversations and injects context without extra code.